
Dan R. left this comment on Episode 45:

Well, so I can no longer be accused of “not sharing the love” here is how I make the sausage, as the saying goes. Mind you, I only make fresh sausage and don’t go for the cured or smoked kind at this stage of my life. Plus, the reason I make our sausage is so I know what’s in it, not because it’s easier or cheaper than buying it.
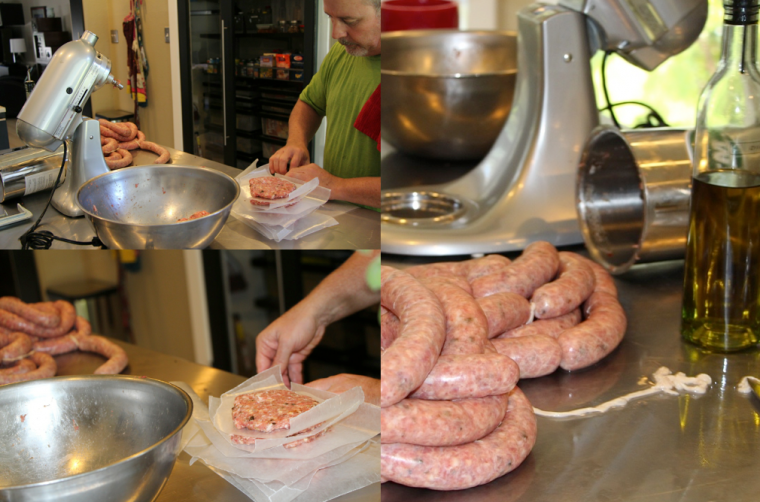
Ok, so here’s the simple sausage recipe Vanessa and & I used in the picture below:
Disclaimer: 1- I never wrote out a recipe before so don’t expect a step-by-step guide ready for a novice. I’m no chef. Heck, at this point in my life I’m lucky I have all my digits! 2- I know there’s probably a million other ways to do it, but (like my rifle), this one is mine. Read more…
Here’s What I Use to Make the Sausage:
- About a 6-7 pound bone-in pork butt. You don’t want it trimmed, you need about 20% fat for good sausage
- One packet of LEM Sweet Italian Sausage Seasoning. Each of the packets in this variety pack makes 5 lbs of sausage. If you’d rather make your own seasoning thee are plenty of recipes on the net.
- I add extra garlic powder and fennel. I love the flavor of fennel in sausage.
- Since we were making this for the whole family, I skipped my usual “way too hot for everyone else” spices.
- Natural hog casings or collagen casings (if you want links), or just form into patties.
- Enough really cold water to make the sausage meat tacky in the mixer. For this recipe, about 1 cup.
- Kitchen Aid Food Grinder Attachment for our Kitchen Aid Mixer
Preparing the Casings:
- If you’re making patties, of course you can skip this step.
- If using natural hog casing, prepare them as directed on the package.
- Essentially, make sure they’re good and rinsed of all salt.
- Make sure they’ve soaked the requisite length (about 30 minutes, but read the package) to ensure they are pliable enough to stuff.
And Here’s the Steps I Take to Grind the Meat:
- Cut the pork but off the bone and make strips or chunks small enough to fit in the Kitchen Aid grinder. I wish I could find some meat market that would grind a pork butt for me, “butt” I can’t. It would make this so much simpler. The reason I don’t use “off the shelf” ground pork is because it’s too lean. Sausage that’s too lean is too dry to eat.
- Once the pork is stripped/chunked, put it in the freezer for a while. Semi-frozen meat is MUCH easier to grind.
- I run all the pork through the grinder using a coarse screen, then I run about 3/4 of the pork back through the grinder using a fine screen. I don’t like chunky sausage and can’t stand big gnarly pieces that make me wonder if I just bit into a knuckle! What’s in there? That’s just poor quality sausage in my book and another reason I make my own.
OK, Pretty Standard Fare So Far. Here’s Where I Get a Little Freaky:
- I take some sun dried tomatoes and run them through the grinder on a fine screen. No set amount, grind enough for your taste.
- Then I run some dried sweet peppers through the grinder on a fine screen. Again, no set amount, grind enough for your taste.
- Finally, I grind about 1 lb of mozzarella on a the grinder on a coarse screen. Mind you, the mozzarella has a lower melt point and the “pros” would probably recommend some other cheese. Well, good for them.
Mixing the Sausage:
- Now, use your Kitchen Aid Mixer or whatever type of mixer you have and mix all this stuff up together. If you don’t have a heavy duty mixer, you may need to do this in smaller batches.
- As for the seasoning, you can dilute that in your cold water or you can add it in the mixer dry and then add the cold water. Whatever floats your boat. I’ve done it each way. Typically though, I do them separately because I may not need all the water and I don’t want to miss out or waste any seasoning.
- As you’re mixing, you can add the cold water or water/seasoning mixture slowly.
- Mix for about 5 minutes or until you see a thin film of the fat starting to stick to the side of the mixing bowl. There’s probably a technical term for that, but I don’t know it.
- You want the sausage wet, but soaked. The wetness will help make stuffing the sausage into the casing much easier.
The Vital Step…Testing:
- Before you move on to stuffing the sausage or making patties, bust out a frying pan and cook up a few small patties to test your flavor. You don’t want to stuff all your sausage and then say, “Geez, I should have added more _______!”
- This is a dangerous point in the process. I tend to cook up and eat too much of a test batch. It just happens!
- Once you think you have the flavor right, it’s time to stuff the sausage!
Making Patties:
- OK, lets be serious…if you don’t know how to make a patty from ground meat by now, you should be making reservations and not sausage. So, I’ll skip that part. What I will say is that wax paper, cut into squares bigger than your patties, will keep the patties separated and easy to use one at a time. Even when frozen you should be able to easily separate one patty from a stack with a butter knife.
Stuffing the Sausage:
- To stuff the sausage I use my LEM Sausage Stuffer. When I bought this about a year ago it was part of a kit. This is a little pricey and if you plan on just making sausage one or two times a year, I’d recommend just making patties. That said, if you plan on making it more often and you want to make links, this is a great package. This stuffer is built like a tank! Seriously…I’ve been in lots of tanks…this thing is built just like them!
- Follow the directions for the LEM stuffer, but essentially fill the canister with your ground sausage.
- Very lightly oil the rubber gasket on the stuffer’s plunger using veggie or olive oil so the gasket doesn’t stick when stuffing.
- Use the appropriate size nozzle for your sausage type and casing. I use the 3/4″ nozzle for my recipe.
- Work a length of casing onto the nozzle and tie a knot in the end.
- Vanessa jumps in at this point. As I turn the handle of the stuffer the casing will begin to fill.
- Vanessa makes sure the fill rate is right as I crank, and curls the link as it fills up. If I crank too fast the casing could overstuff and burst. If I crank too slowly the casing won’t be filled enough. Vanessa “guides” the filled casing so the fill amount is just right.
There you have it! A simple sausage recipe that will make you the envy of every sausage-loving person in your inner circle. Amaze your friends, delight your acquaintances, and make your neighbors jealous! Yes, your sausage will be the talk of the town! I’ll just leave it at that…
That’s it! Wow, this was WAY LONGER than I thought it would be. So, Dan R., you owe me one, brother! 😉 I hope this helps!
Thank you, thank you, thank you. This will go great with my homemade sauerkraut! You guys rock!! (Go Navy!)